Common API Overview
TAVMedia Authentication
Authentication is required before using the TAVMedia SDK. Authentication only needs to be performed once during the app startup process. It is recommended to perform it in the callback of the app startup. For specific authentication operations, please refer to the License Guide. If it has not been authenticated or the authentication failed, a constantly moving label will be displayed on the screen.
Basic function
The main functions of TAVMedia SDK consist of TAVClip, TAVSurface, TAVVideoReader and TAVAudioReader.
TAVClip
TAVClip is the structure of playback data, used to describe the playback content, occurrence time, and location. The types of Clips mainly include the following two:
-Media Type: Usually can be played directly, including Audio, Movie, Composition, and PAG Sticker.
Effect type: used for special effects processing on Clips, including audio fade-in and fade-out, Clip position transformation, PAG effects, LUT, saturation and brightness adjustment, etc.
TAVSurface
TAVSurface is a rendering canvas used for final rendering of the image. It can be created through CAEAGLLayer and CVPixelBuffer in iOS.
TAVVideoReader
TAVVideoReader is a rendering controller used to control the drawing progress and, together with TAVSurface, controls the playback of TAVClip images.
Use TAVMedia to render video
【Android】
//In Android, implement the TAVTextureView control inherited from the TextureView control, create a TAVSurface through the SurfaceTexture in the TextureView, and render the picture on the TAVSurface. The implementation of TAVTextureView is as follows:

public class TAVTextureView extends TextureView implements TextureView.SurfaceTextureListener {

    private static final String TAG = "TAVTextureView";
    private final int fps = 20;
    private final int frameDuration = 1000 / fps;
    private boolean isAttachedToWindow = false;
    private TAVSurface mediaSurface;
    private TAVVideoReader videoReader;
    private TAVMovie media;
    private boolean isPlaying = false;

    public TAVTextureView(Context context) {
        this(context, null);
    }

    public TAVTextureView(Context context, AttributeSet attrs) {
        super(context, attrs);
        setOpaque(false);
        setSurfaceTextureListener(this);
        setKeepScreenOn(true);
    }

    @Override
    public void onSurfaceTextureAvailable(SurfaceTexture surface, int width, int height) {
        if (mediaSurface != null) {
            mediaSurface.release();
            mediaSurface = null;
        }
        if (videoReader != null) {
            videoReader.release();
            videoReader = null;
        }
        // 通过 SurfaceTexture 创建 TAVSurface
        mediaSurface = TAVSurface.FromSurfaceTexture(surface);
        if (!isPlaying) {
            play();
        }
    }

    public void setMedia(TAVMovie media) {
        this.media = media;
    }

    @Override
    public void onSurfaceTextureSizeChanged(SurfaceTexture surface, int width, int height) {

    }

    @Override
    public boolean onSurfaceTextureDestroyed(SurfaceTexture surface) {
        if (isPlaying) {
            stop();
        }
        if (mediaSurface != null) {
            mediaSurface.release();
            mediaSurface = null;
            videoReader = null;
        }
        if (videoReader != null) {
            videoReader.release();
            videoReader = null;
        }
        if (!isPlaying) {
            stop();
        }
        return false;
    }

    @Override
    public void onSurfaceTextureUpdated(SurfaceTexture surface) {
    }

    @Override
    protected void onAttachedToWindow() {
        isAttachedToWindow = true;
        super.onAttachedToWindow();
    }

    @Override
    protected void onDetachedFromWindow() {
        isAttachedToWindow = false;
        super.onDetachedFromWindow();
    }

    public boolean isPlaying() {
        return isPlaying;
    }

    public void stop() {
        isPlaying = false;
    }

    public void play() {
        if (!isAttachedToWindow) {
            return;
        }
        isPlaying = true;
        new Thread(new RenderRunnable(), "tav_demo_play_thread").start();
        new Thread(new AudioRenderRunnable(), "tav_demo_play_audio_thread").start();
    }

    private class RenderRunnable implements Runnable {

        @Override
        public void run() {
            if (mediaSurface == null) {
                return;
            }
            videoReader = TAVVideoReader.Make(media, fps);
            if (videoReader == null) {
                return;
            }
            videoReader.setSurface(mediaSurface);
            runLoop(videoReader);
        }

        private void runLoop(TAVVideoReader videoReader) {
            while (isPlaying()) {
                long startTime = System.currentTimeMillis();
                videoReader.readNextFrame();
                long timeCons = System.currentTimeMillis() - startTime;
                Log.d(TAG, "video read: timeCons = " + timeCons);
                if (timeCons < frameDuration) {
                    trySleep(frameDuration - timeCons);
                }
            }
        }

        private void trySleep(long millis) {
            try {
                Thread.sleep(millis);
            } catch (InterruptedException e) {
                e.printStackTrace();
            }
        }
    }

    private class AudioRenderRunnable implements Runnable {

        @Override
        public void run() {

            TAVAudioReader audioReader = TAVAudioReader.Make(media);
            AudioTrackWrapper audioTrackWrapper = new AudioTrackWrapper(44100, 2);
            audioTrackWrapper.setVolume(1);
            // Start
            runLoop(audioReader, audioTrackWrapper);
            // Finish
            audioTrackWrapper.release();
        }

        private void runLoop(TAVAudioReader audioReader, AudioTrackWrapper audioTrackWrapper) {
            if (audioReader == null || audioTrackWrapper == null) {
                return;
            }
            while (isPlaying()) {
                long startTime = System.currentTimeMillis();
                TAVAudioFrame frame = audioReader.readNextFrame();
                audioTrackWrapper.writeData(frame.data, 0, (int) frame.length);
                long timeCons = System.currentTimeMillis() - startTime;
                Log.i(TAG, "audio read: timeCons = " + timeCons + ", timestamp = " + frame.timestamp + ", duration = "
                        + frame.duration);

                long frameDurationMs = frame.duration / 1000;
                if (timeCons < frameDurationMs) {
                    trySleep(frameDurationMs - timeCons);
                }
            }
        }

        private void trySleep(long millis) {
            try {
                Thread.sleep(millis);
            } catch (InterruptedException e) {
                e.printStackTrace();
            }
        }
    }
}

//Build the rendering structure composition and perform rendering as follows:
// Create rendering structure
TAVComposition makeComposition(){
    long totalDuration = 3 * 1000 * 1000;
    int maxWidth = 0;

    TAVMovieAsset movieAsset = TAVMovieAsset.MakeFromPath(Utils.OUT_SAVE_DIR + "video-640x360.mp4");
    TAVMovie movie = TAVMovie.MakeFrom(movieAsset,0,totalDuration);

    movie.setStartTime(0);
    movie.setDuration(totalDuration);

    maxWidth = movieAsset.width();

    TAVImageAsset imageAsset = TAVImageAsset.MakeFromPath(Utils.OUT_SAVE_DIR + "hermione.jpg");
    TAVMovie imageMovie = TAVMovie.MakeFrom(imageAsset,0,totalDuration);
    imageMovie.setStartTime(0);
    imageMovie.setDuration(totalDuration);
    Matrix matrix = new Matrix();
    matrix.postTranslate(0,movieAsset.height() + 10);
    imageMovie.setMatrix(matrix);

    maxWidth = Math.max(maxWidth,imageAsset.width());

    TAVComposition composition = TAVComposition.Make(maxWidth,movieAsset.height() + imageAsset.height() + 10,0,totalDuration);
    composition.addClip(movie);
    composition.addClip(imageMovie);
    composition.setDuration(totalDuration);
    return composition;
}

// Perform rendering
DisplayMetrics displayMetrics = new DisplayMetrics();
getWindowManager().getDefaultDisplay().getMetrics(displayMetrics);

TAVComposition composition = makeComposition();

Utils.fitToTarget(composition, displayMetrics.widthPixels, displayMetrics.heightPixels);

textureView.setMedia(composition);
【iOS】
//  Create render target
- (TAVSurface*)createSurfaceWithCALayer {
    // Create CAEAGLLayer and add it to the view
    self.glLayer = [CAEAGLLayer layer];
    self.glLayer.frame = CGRectMake(0, 0, self.view.bounds.size.width, self.view.bounds.size.height);
    self.glLayer.drawableProperties = @{ kEAGLDrawablePropertyRetainedBacking: @NO, kEAGLDrawablePropertyColorFormat: kEAGLColorFormatRGBA8 };
    [self.view.layer addLayer:self.glLayer];

    // Create TAVSuface based on layer to quickly display the screen
    return [TAVSurface FromLayer:self.glLayer];
}

+ (CVPixelBufferRef)createPixelBuffer:(NSInteger)width height:(NSInteger)height {
    if (width == 0 || height == 0) {
        return nil;
    }
    CFDictionaryRef empty = CFDictionaryCreate(kCFAllocatorDefault, NULL, NULL, 0, &kCFTypeDictionaryKeyCallBacks, &kCFTypeDictionaryValueCallBacks);
    CFMutableDictionaryRef attrs
        = CFDictionaryCreateMutable(kCFAllocatorDefault, 1, &kCFTypeDictionaryKeyCallBacks, &kCFTypeDictionaryValueCallBacks);
    CFDictionarySetValue(attrs, kCVPixelBufferIOSurfacePropertiesKey, empty);
    CVPixelBufferRef pixelBuffer = nil;
    CVReturn status = CVPixelBufferCreate(kCFAllocatorDefault, width, height, kCVPixelFormatType_32BGRA, attrs, &pixelBuffer);
    CFRelease(attrs);
    CFRelease(empty);
    if (status != kCVReturnSuccess) {
        return nil;
    }
    CFAutorelease(pixelBuffer);
    return pixelBuffer;
}

- (TAVSurface*)createSurfaceWithPixelBuffer {
    // Create an off-screen surface through pixelBuffer, and subsequent content will be drawn to the pixelBuffer.
    // TAVMedia can be quickly embedded into the existing rendering chain of the business through pixelBuffer.
    CVPixelBufferRef pixelBuffer = [self createPixelBuffer:movie.width height:movie.height];
    return [TAVSurface FromCVPixelBuffer:pixelBuffer];
}

// Create rendering structure
- (TAVMovie *)makeMovie {
    // TAVMedia time data is in microseconds, totalDuration is actually expressed as 3 seconds in TAVMedia
    NSInteger totalDuration = 3 * 1000 * 1000;
    // Construct the video structure that needs to be played
    NSString *movieFilePath = [[NSBundle mainBundle] pathForResource:@"video-640x360" ofType:@"mp4"];
    // asset is the required resource data
    TAVMovieAsset *movieAsset = [TAVMovieAsset MakeFromPath:movieFilePath];
    // movie inherits from clip, which represents a fragment of the asset and is used for playback in VideoReader/AudioReader
    // startTime in MakeFrom represents the start time of the movie in the asset, and duration represents the interception time of the movie in the asset
    // The startTime and duration during Make construction currently do not provide modification interfaces
    TAVMovie *movie = [TAVMovie MakeFrom:movieAsset startTime:0 duration:totalDuration];
    // Different from the Make function, setStartTime represents the start time in the parent composition container, and no longer represents the start time of the asset
    [movie setStartTime:0];
    // Different from the Make function, setDuration represents the duration in the parent composition container, and no longer represents the interception duration of the asset
    [movie setDuration:totalDuration];
    return movie;
}

// Build the render controller
- (void)setupVideoReader {
    self.movie = [self makeMovie];
    // Construct a videoReader to control video playback. The frameRate can be set according to business needs
    self.videoReader = [TAVVideoReader MakeFrom:self.movie frameRate:60];
    // Set the scaling mode so that the video is centered on the surface. Note: ScaleMode will overwrite the Movie matrix
    [self.videoReader setScaleMode:TAVScaleModeLetterBox];
    // Construct a surface to provide display targets for videoReader
    // If you want to embed it into an existing rendering chain, you can use [self createSurfaceWithPixelBuffer]
    self.surface = [self createSurfaceWithCALayer];
    [self.videoReader setSurface:self.surface];

    // Draw the 0th second
    [self displayFirstFrame];
}

- (void)displayFirstFrame {
    // Render the 0th second screen
    // seek to 0th second
    [self.videoReader seekTo:0];
    // When seekTo is called, readNextFrame will render the current frame data of seekTo
    // When seekTo is not called, each readNextFrame will cause the time inside the videoReader to increase automatically according to the frame rate.
    // After readNextFrame is called, the content will be drawn to the surface
    [self.videoReader readNextFrame];
}
Use TAVMedia SDK to obtain audio data
【Android】
TAVAudioReader audioReader = TAVAudioReader.Make(media);
TAVAudioFrame frame = audioReader.readNextFrame();
【iOS】
// Build audio controller
- (void)setupAudioReader {
    // Create an audio controller based on movie. The sampling rate, number of samples, and number of channels can be set according to business needs
    self.audioReader = [TAVAudioReader MakeFrom:self.movie sampleRate:44100 sampleCount:1024 channels:1];

    // Get the pcm data of the 0th second
    [self.audioReader seekTo:0]; //seek to the 0th second
    // When seekTo is called, readNextFrame will render the current frame data of seekTo
    // When seekTo is not called, each readNextFrame will obtain the next data block according to the audio configuration
    TAVAudioFrame *frame = [self.audioReader readNextFrame];
    frame.timestamp // Start time of audio data (unit us)
    frame.duration // Duration of audio data (unit us)
    frame.data // pcm data of audio data
}
TAVMedia Hierarchy
For TAVMedia SDK, TAVVideoReader, TAVAudioReader and TAVSurface are relatively simple and their usage methods are relatively fixed. Please refer to the basic functions for specific usage methods.
For businesses, modifying the rendering structure TAVClip is a complex editing operation. TAVClip is a segment of rendered content, which can be of specific types such as video, audio, images, or special effects. Usually, editing scenes requires processing multiple TAVClips, and the relationship between these TAVClips is the problem solved by the TAVMedia hierarchy.
Related class description
| Class name | Function |
| TAVClip | Rendering structure base class, all rendering structures inherit from TAVClip |
| TAVComposition | TAVComposition is a subclass of TAVClip, representing a collection of a series of TAVClips |
Construct rendering structure
In TAVMedia SDK, TAVComposition is used to solve scenes where special effects need to span multiple TAVClips. For example, atmosphere effects and LUT effects need to be applied to all videos. At the same time, these special effects can only add one input, and cannot use all videos as inputs. At this time, all videos can be combined into a TAVComposition, and TAVComposition can be used as the input of special effects to meet the requirements. A constructed rendering structure usually looks like the following figure:
When constructing the rendering structure, a TAVClip cannot exist in multiple TAVCompositions at the same time. If a TAVClip is added to multiple TAVCompositions at the same time, the TAVClip will first be removed from the previous TAVComposition and then added to the new TAVComposition. At the same time, in order to prevent the TAVMedia hierarchy from becoming a ring, TAVComposition cannot add a child node to contain its own TAVComposition.
As shown in the figure below, it is disassembled using commonly used orbit scenes. Each track in the orbit scene corresponds to TAVMedia and is a TAVComposition.
The main track is equivalent to the bottom TAVComposition as the input of other effect tracks. When adding an effects track, such as a LUT effects track, this behavior combines its own effects TAVClip with the input into a new TAVComposition. Tracks that do not require input, such as audio tracks or picture-in-picture tracks, can be added to the final rendered TAVComposition.
TAVMedia display control
This section describes how to use the TAVMedia SDK to control position and transparency.
Introduction to related classes
| Class name | Function |
| TAVAsset | Material resource class, used to represent basic material resources |
| TAVMovie | TAVMovie is used to create rendering data of different time periods based on the material TAVAsset, and can also set location information |
| TAVComposition | TAVComposition inherits from TAVMovie, and TAVComposition represents the composition of a series of TAVClips. The operation of TAVComposition will be applied to all child TAVClips |
Use matrix, cropRect and alpha to control display behavior
Except for TAVMovie, other TAVClips usually do not have location information. In TAVMovie, businesses can control the display behavior of TAVMovie by setting matrix, cropRect and alpha.
Matrix
Matrix is the change matrix of Movie in Composition, used to control the position of Movie. Matrix defaults to a standard matrix. The relative (0,0) point of the Matrix is the upper left corner of the parent matrix. The specific coordinate system is shown in the figure below:
CropRect
CropRect is the cropping area of the Movie relative to itself. cropRect is only related to the width and height of the Movie itself and has nothing to do with other Clips. During the rendering process, Movie will first use Matrix to calculate its position, and then use cropRect to crop other parts.
Example
Example1
Take the middle 1/4 part and display it in its original position. The code is as follows:
【Android】
TAVMovie movieWithCropRectAndMatrix = TAVMovie.MakeFrom(asset, 0, totalDuration);
movieWithCropRectAndMatrix.setDuration(totalDuration);

Matrix matrix = new Matrix();
matrix.postTranslate((float)-asset.width() / 2,(float)-asset.height() / 2);
matrix.postScale(2.0f,2.0f);
matrix.postTranslate((float) asset.width() /2,(float) asset.height() / 2);

RectF cropRect = new RectF((float)asset.width() / 4,(float)asset.height() / 4,(float)asset.width() / 2,(float)asset.height() / 2);
movieWithCropRectAndMatrix.setCropRect(cropRect);
movieWithCropRectAndMatrix.setMatrix(matrix);
【iOS】
// movie displays part of the screen through CropRect + matrix and moves it to the correct position
// Movie will apply matrix first and then cropRect. Matrix is the position relative to the parent composition, and cropRect is the cropping area relative to its own content
TAVMovie *movieWithCropRectAndMatrix = [TAVMovie MakeFrom:asset startTime:0 duration:totalDuration];
[movieWithCropRectAndMatrix setDuration:totalDuration];
// Move the anchor point to 0,0
CGAffineTransform matrix = CGAffineTransformMakeTranslation(-asset.width / 2, -asset.height / 2);
// Stretch twice based on anchor point
matrix = CGAffineTransformConcat(matrix, CGAffineTransformMakeScale(2.0, 2.0));
// Restore anchor point displacement
matrix = CGAffineTransformConcat(matrix, CGAffineTransformMakeTranslation(asset.width / 2, asset.height / 2));
// After cropping, only the middle part remains
CGRect cropRect = CGRectMake(asset.width / 4, asset.height / 4, asset.width / 2, asset.height / 2);
[movieWithCropRectAndMatrix setCropRect:cropRect];
[movieWithCropRectAndMatrix setMatrix:matrix];
Example 2
You can control the transparency of a Movie by setting its opacity. The sample code is as follows:
Description:
The value range is 0.0 - 1.0. 0 is completely transparent, 1 is completely opaque.
【Android】
TAVMovie movieWithCropRectAndMatrix = TAVMovie.MakeFrom(asset, 0, totalDuration);
// Set upopacity
movieWithOpacity.setOpacity(0.5);
【iOS】
TAVMovie *movieWithOpacity = [TAVMovie MakeFrom:asset startTime:0 duration:totalDuration];
// Set the opacity directly through the opacity attribute
movieWithOpacity.opacity = 0.5;
TAVMedia time control
Introduction to related classes
| Class name | Function |
| TAVClip | Base class for rendering structures, used to control the timeline |
| TAVComposition | TAVComposition consists of a series of TAVClips, and operations on TAVComposition will be applied to all child TAVClips |
| TAVAsset | Material resource class, used to represent basic material resources |
| TAVMovie | TAVMovie is used to create rendering data of different time periods based on the material TAVAsset |
Arrange the timeline through TAVClip and TAVComposition
In the TAVMedia SDK, timing control occurs through the nesting of TAVClip and TAVComposition.
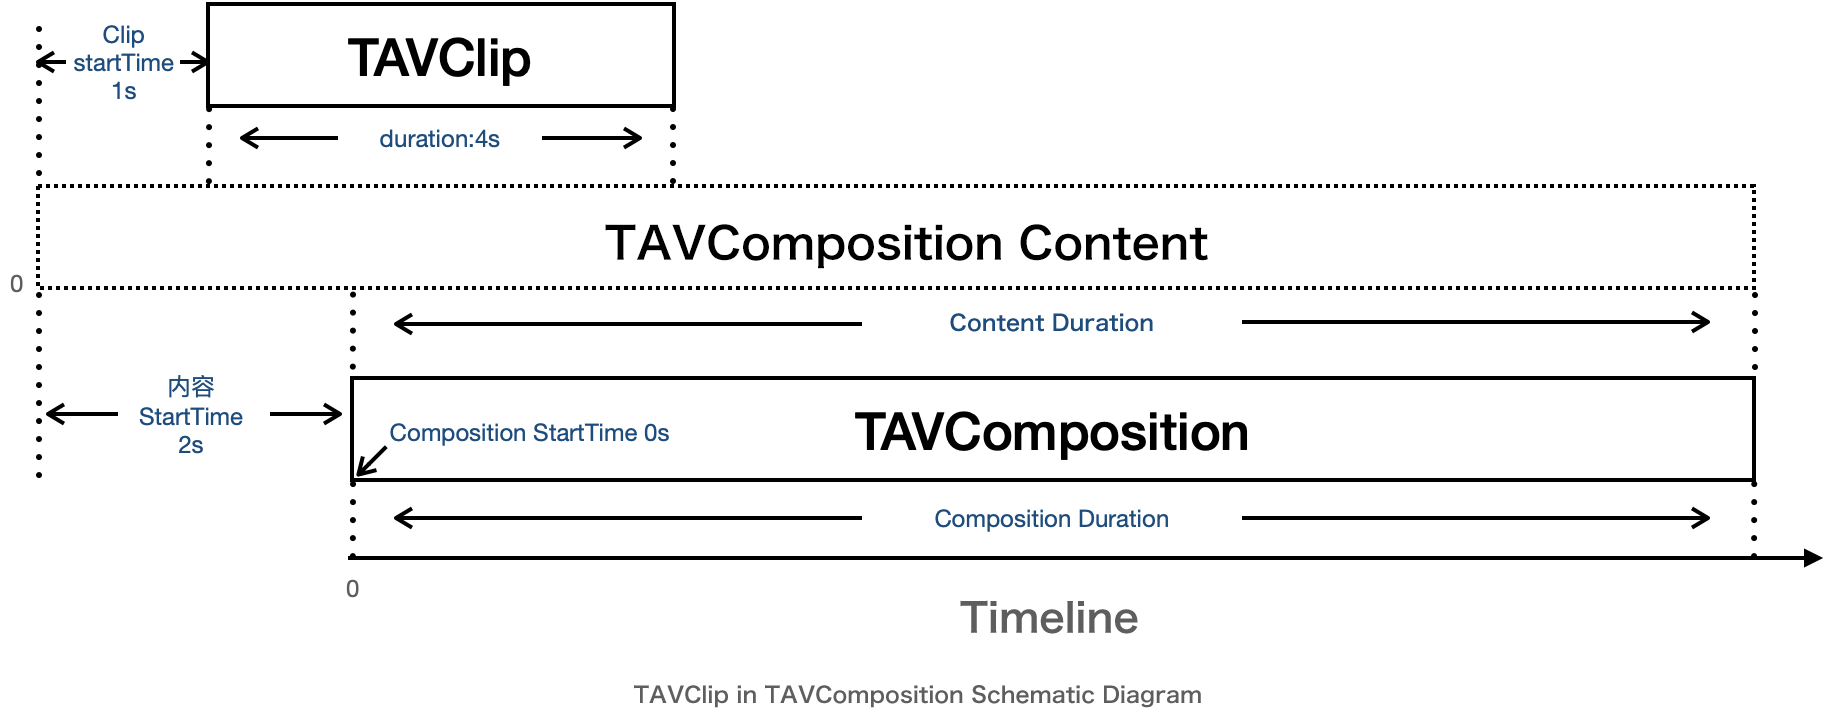
TAVClip is the base class of the rendering structure and has two basic attributes: startTime and duration. startTime determines the time point when TAVClip appears in TAVComposition, and duration determines how long TAVClip appears in TAVComposition.
TAVComposition is a collection of TAVClips. The time of the TAVClip inside a TAVComposition is relative to the TAVComposition. TAVComposition can set ContentStartTime and ContentDuration when constructing, which is used to clip the collection timeline. At the same time, TAVComposition inherits from TAVClip, and startTime and duration can also be set and added to other TAVComposition.
Example
Assume that a TAVClip that appears in 1s and displays for 4s is added to TAVComposition, and the first 2s of TAVComposition are skipped. The specific situation is as shown in the figure below: The sample code is as follows:
【Android】
TAVClip clip = new TAVClip();
clip.setStartTime( 1 * 1000 * 1000);
clip.setDuration(4 * 1000 * 1000);

TAVComposition composition =  TAVComposition.Make(720,1280, 2 * 1000 * 1000, 10 * 1000 * 1000);
composition.setDuration(10 * 1000 * 1000);
composition.addClip(clip);
【iOS】
// createClip represents the previous behavior of creating clip
TAVClip * clip = [self createClip];
// Set the start time of Clip to 1000000us
clip.startTime = 1 * 1000 * 1000;
// Set the duration of Clip to 4000000us
clip.duration = 4 * 1000 * 1000;
// Create a Composition with a resolution of 720*1280
// The startTime during make corresponds to CompositionContentStartTime
// The duration during make corresponds to CompositionContentDuration
TAVComposition * composition = [TAVComposition Make:720 height:1280 startTime:2 * 1000 * 1000 duration:10 * 1000 * 1000];
// The default startTime of clip is 0. You don’t need to set composition.startTime = 0;
// Set compositionDuration to 10 * 1000 * 1000
composition.duration = 10 * 1000 * 1000;
// Add clip to composition
[composition addClip:clip];
Crop resource clips through TAVMovie
In addition to TAVComposition can crop its own content, TAVMovie can also crop the material TAVAsset.
TAVAsset is a material resource class, usually created based on Data or Path, and represents image, video, and audio resources. TAVAsset cannot be added directly to the rendering structure, and the rendering structure corresponding to the resource needs to be created through TAVMovie.
TAVMovie represents a clip in a TAVAsset. ContentStartTime and ContentDuration can be set during construction to determine the position of TAVMovie in TAVAsset. TAVMovie also inherits from TAVClip and can be used in TAVMovie to control the position of clips in TAVComposition.
Example
Construct a scene that intercepts 1 to 4 seconds of video resources. The sample code is as follows:
【Android】
String path = Utils.OUT_SAVE_DIR + "video-640x360.mp4";
TAVMovieAsset asset = TAVMovieAsset.MakeFromPath(path);
TAVMovie movie = TAVMovie.MakeFrom(asset, 1 * 1000 * 1000, 4 * 1000 * 1000);
movie.setStartTime(0);
movie.setDuration(4 * 1000 * 1000);
【iOS】
NSString *movieFilePath = [[NSBundle mainBundle] pathForResource:@"video-640x360" ofType:@"mp4"];
// Construct resource asset based on path
TAVAsset* asset = [TAVMovieAsset MakeFromPath:movieFilePath];
// Build a movie based on resources and intercept 1~4s of the resources
TAVMovie *movie = [TAVMovie MakeFrom:asset startTime:1 * 1000 * 1000 duration:4 * 1000 * 1000];
// ---- movie construction completed ----

// Note: After constructing the movie, you also need to set startTime and duration to define the position in the composition time
// Different from the Make function, setStartTime represents the starting time in the parent composition container, and no longer represents the starting time of the asset
movie.startTime = 0;
// Different from the Make function, setDuration represents the duration in the parent composition container, and no longer represents the interception duration of the asset
movie.duration = 4 * 1000 * 1000;
Variable speed
When TAVMovie's contentDuration does not match its own duration, TAVMovie will change speed. TAVComposition is similar to TAVMovie. When the ContentDuration and duration of TAVComposition are inconsistent, the content of TAVComposition will also change speed.
Example
Play a 10s video at double speed. The example code is as follows:
【Android】
// Change speed directly through Movie
long totalDuration = 10 * 1000 * 1000;
String path = Utils.OUT_SAVE_DIR + "video-640x360.mp4";
TAVMovieAsset asset = TAVMovieAsset.MakeFromPath(path);
TAVMovie movie = TAVMovie.MakeFrom(asset, 0, totalDuration);
movie.setStartTime(0);
movie.setDuration(totalDuration / 2.0);

// Change speed through Composition
String path = Utils.OUT_SAVE_DIR + "video-640x360.mp4";
TAVMovieAsset asset = TAVMovieAsset.MakeFromPath(path);
TAVMovie movie = TAVMovie.MakeFrom(asset, 0, totalDuration);
movie.setStartTime(0);
movie.setDuration(totalDuration);
TAVComposition composition = TAVComposition.Make(640, 360, 0, totalDuration);
composition.setStartTime(0);
composition.setDuration(totalDuration / 2.0);
【iOS】
// Change speed directly through Movie
NSInteger totalDuration = 10 * 1000 * 1000;
NSString *movieFilePath = [[NSBundle mainBundle] pathForResource:@"video-640x360" ofType:@"mp4"];
TAVMovieAsset *asset = [TAVMovieAsset MakeFromPath:movieFilePath];
TAVMovie *movie = [TAVMovie MakeFrom:asset startTime:0 duration:totalDuration];
[movie setStartTime:0];
[movie setDuration:totalDuration / 2.0];

// Change speed through Composition
NSString *movieFilePath = [[NSBundle mainBundle] pathForResource:@"video-640x360" ofType:@"mp4"];
TAVMovieAsset *asset = [TAVMovieAsset MakeFromPath:movieFilePath];
TAVMovie *movie = [TAVMovie MakeFrom:asset startTime:0 duration:totalDuration];
[movie setStartTime:0];
[movie setDuration:totalDuration];
TAVComposition* composition = [TAVComposition Make:640 height:360 startTime:0 duration:totalDuration];
[composition setStartTime:0];
[composition setDuration:totalDuration / 2.0];
Freeze
Similar to variable speed, when contentDuration = 0 or approximately 0, the TAVmovie or TAVcomposition screen will be fixed.
示例
Take the content of the first second of the video and freeze it for 10 seconds. The sample code is as follows:
【Android】
// Freeze frame through Movie
long totalDuration = 10 * 1000 * 1000;
String path = Utils.OUT_SAVE_DIR + "video-640x360.mp4";
TAVMovieAsset asset = TAVMovieAsset.MakeFromPath(path);
TAVMovie movie = TAVMovie.MakeFrom(asset, 1 * 1000 * 1000, 0);
movie.setStartTime(0);
movie.setDuration(totalDuration);

// Freeze frame through Composition
String path = Utils.OUT_SAVE_DIR + "video-640x360.mp4";
TAVMovieAsset asset = TAVMovieAsset.MakeFromPath(path);
TAVMovie movie = TAVMovie.MakeFrom(asset, 0, totalDuration);
movie.setStartTime(0);
movie.setDuration(totalDuration);
TAVComposition composition = TAVComposition.Make(640, 360, 1 * 1000 * 1000, totalDuration);
composition.setStartTime(0);
composition.setDuration(totalDuration);
【iOS】
// Freeze frame through Movie
NSInteger totalDuration = 10 * 1000 * 1000;
NSString *movieFilePath = [[NSBundle mainBundle] pathForResource:@"video-640x360" ofType:@"mp4"];
TAVMovieAsset *asset = [TAVMovieAsset MakeFromPath:movieFilePath];
TAVMovie *movie = [TAVMovie MakeFrom:asset startTime:1 * 1000 * 1000 duration:0];
[movie setStartTime:0];
[movie setDuration:totalDuration];

// Freeze frame through Composition
NSString *movieFilePath = [[NSBundle mainBundle] pathForResource:@"video-640x360" ofType:@"mp4"];
TAVMovieAsset *asset = [TAVMovieAsset MakeFromPath:movieFilePath];
TAVMovie *movie = [TAVMovie MakeFrom:asset startTime:0 duration:totalDuration];
[movie setStartTime:0];
[movie setDuration:totalDuration];
TAVComposition* composition = [TAVComposition Make:640 height:360 startTime:1 * 1000 * 1000 duration:0];
[composition setStartTime:0];
[composition setDuration:totalDuration];变速
TAVMedia audio playback
Introduction to related classes
| Class name | Function |
| TAVAudio | Audio clips created through Asset |
| TAVAudioVolumeEffect | Audio fade effect |
TAVAudio
TAVAudio can create audio clips through Asset. At this time, Audio contains only audio data and no video data. Through TAVAudio, businesses can add background music and obtain audio from videos. The audio volume can be set through the volume interface, and the volume range is 0 - 1.0.
TAVAudioVolumeEffect
TAVAudioVolumeEffect is TAVMedia's own audio volume control effect, which can quickly fade in and out of Clips. The input to TAVAudioVolumeEffect can be TAVAudio or any Clip with audio.
Example
Add BGM and fade in/out. The code is as follows:
【Android】
long totalDuration = 10 * 1000 * 1000;
// Construct audio track
String path = Utils.OUT_SAVE_DIR + "hoaprox.mp3";
TAVAudioAsset asset = TAVAudioAsset.MakeFromPath(path);
TAVAudio audio = TAVAudio.MakeFrom(asset, 0, totalDuration);
audio.setDuration(totalDuration);
// Construct audio transformation effects
// Fade in for the first 3 seconds and fade out for the last 3 seconds
TAVAudioVolumeEffect effect = TAVAudioVolumeEffect.MakeFIFOEffect(audio,
        1.0f, 3 * 1000 * 1000, 3 * 1000 * 1000);
effect.setStartTime(0);
effect.setDuration(totalDuration);
【iOS】
// Construct audio track
NSString *audioPath = [[NSBundle mainBundle] pathForResource:@"hoaprox" ofType:@"mp3"];
TAVAudioAsset *asset = [TAVAudioAsset MakeFromPath:audioPath];
TAVAudio *audio = [TAVAudio MakeFrom:asset startTime:0 duration:totalDuration];
[audio setDuration:totalDuration];

// Construct audio transformation effects
// Fade in for the first 3 seconds and fade out for the last 3 seconds
TAVAudioVolumeEffect *effect = [TAVAudioVolumeEffect MakeFIFOEffect:audio maxVolume:1.0f fadeInDuration:3 * 1000 * 1000 fadeOutDuration:3 * 1000 * 1000];
// TAVAudioVolumeEffect can also be created based on a specific sound transformation array, allowing the business to customize the audio change curve
// + (instancetype)MakeVolumeEffect:(TAVClip *)clip volumeRampList:(NSArray<TAVKeyFrame *> *)volumeRampList;
// Note: The time of volumeRampList is relative to Effect. If the positions of Effect and Clip on the timeline are inconsistent, the effect may not be as expected

// Note that startTime and duration need to be set here to ensure that they appear at the same time as the input
[effect setStartTime:audio.startTime];
[effect setDuration:audio.durat
TAVMedia add effects
TAVMedia SDK uses TAVEffect to add various effects to TAVClip, including advanced functions such as hue and saturation adjustment, lut transformation, position transformation, transitions, and PAG filter effects.
Introduction to related classes
| Class name | Function |
| TAVClip | Basic rendering structure |
| TAVEffect | Inherited from TAVClip as the effect base class |
| TAVComposition | TAVComposition consists of a series of TAVClips, which control the rendering process during rendering |
Rendering process in TAVComposition
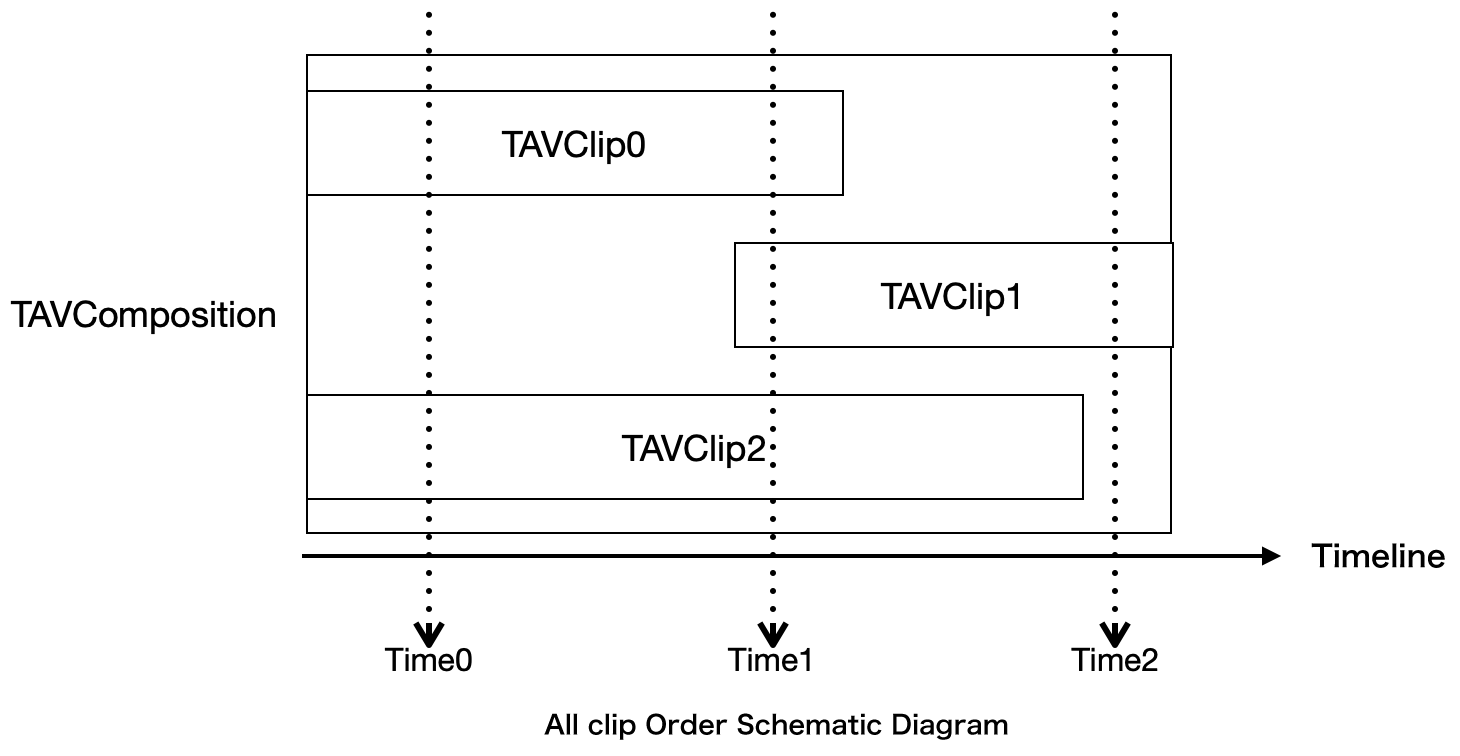
Usually, the rendering order of TAVComposition is in the order of addition. As shown in the following figure, TAVComposition has added TAVClip0, TAVClip1, and TAVClip2 in sequence.
At Time1, all three TAVClips are displayed, and Composition will draw TAVClip0 > TAVClip1 > TAVClip2 in sequence.
At Time0, since TAVClip1 cannot be displayed, the drawing order is TAVClip0 > TAVClip2.
At Time2, the drawing order is TAVClip1
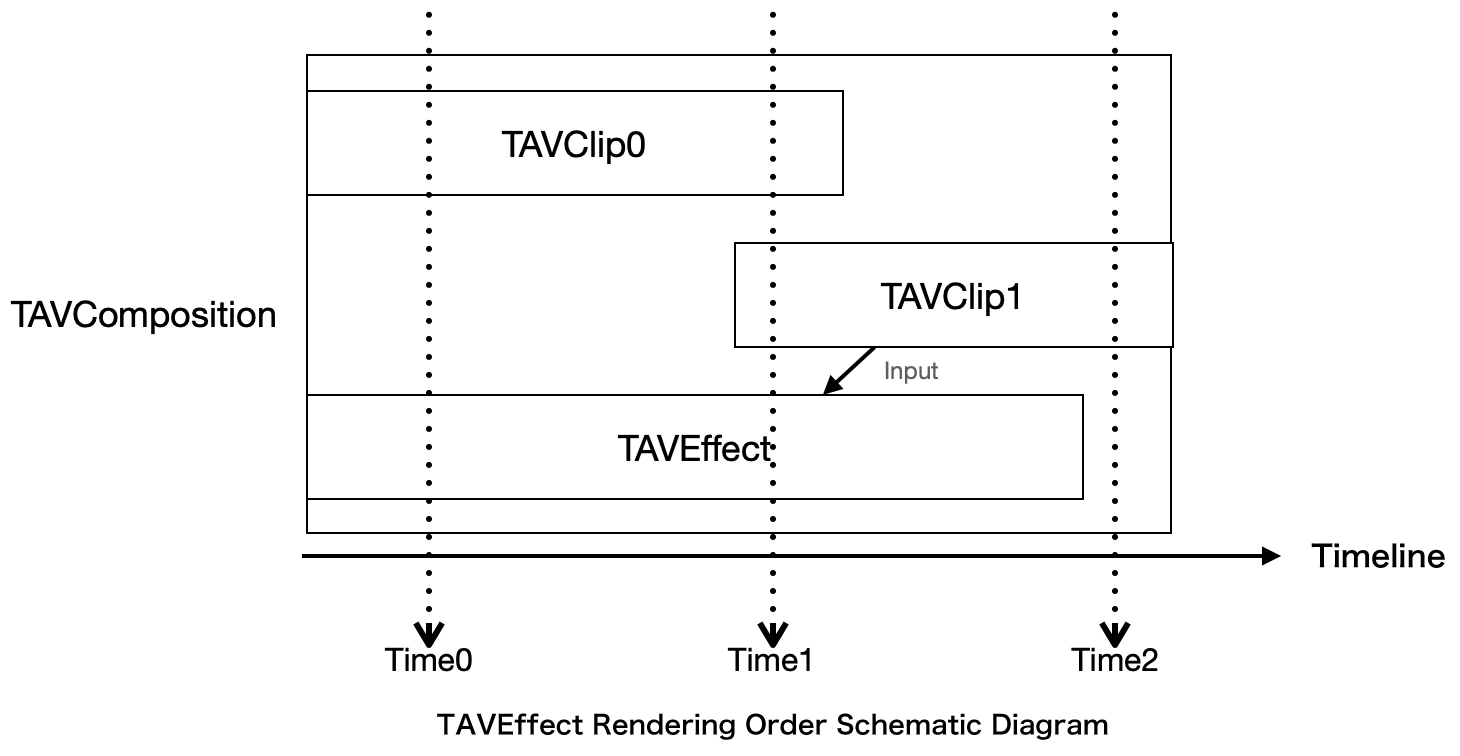
After adding TAVEffect, TAVEffect's InputClip will be rendered when TAVEffect needs it. As shown in the figure below, TAVClip2 is a TAVEffect, and TAVClip1 is the Input of TAVClip.
At Time0, the drawing order is TAVClip0 > TAVEffect. TAVEffect will try to obtain the image of TAVClip1. However, since TAVClip1 is not displayed, TAVEffect will treat the Input as not existing.
At Time1, the drawing order is TAVClip0 > TAVEffect. At this time, although TAVClip1 is within the display range, it will not be actively drawn. TAVEffect will obtain the image of TAVClip1 for processing and then draw it.
At Time2, the drawing order is TAVClip1, and TAVEffect is not displayed. TAVClip1 is not affected by Effect and is drawn directly to the canvas.
Effects supported in TAVMedia
TAVTransformEffect
| Enter the number | Function | Precautions |
| 1 | Support dynamically moving the position and transparency of Input based on time | Parameter Property timeline is a relative Effect, and the coordinates corresponding to the anchor point are absolute coordinates. |
Example
The effect of rotating 90 degrees over time. The code is as follows:
【Android】
TAVTransform2D transform2D = new TAVTransform2D();
TAVKeyframe[] keyframes = {
        TAVKeyframe.MakeLinear(0,1 * 1000 * 1000,0,90)
};
TAVAnimatableProperty rotation = new TAVAnimatableProperty(keyframes);
transform2D.rotation = rotation;

TAVTransformEffect effect = TAVTransformEffect.Make(transform2D);
effect.setStartTime(1 * 1000 * 1000);
effect.setDuration(1 * 1000 * 1000);
effect.addInput(inputClip);
composition.addClip(effect);
【iOS】
TAVTransform2D* transform2D = [TAVTransform2D new];
// Values that do not change over time can be directly used with TAVProperties
// exmaple:
// TAVProperty* value = [TAVProperty new];
// value.value = @(90);

// Construct a rotation Property that dynamically transforms over time
TAVAnimatableProperty* rotation = [TAVAnimatableProperty new];
// Create a linear rotation animation from 0 to 90 degrees, the animation lasts for 1 second
rotation.keyFrames = [TAVKeyFrame MakeLinear:0 endTime:1 * 1000 * 1000 startValue:@(0) endValue:@(90)];
transform2D.rotation = rotation;
// transform2D has other parameters, please refer to TAVTransform2D.h for details
// Create effect based on transform2D
TAVTransformEffect* effect = [TAVTransformEffect Make:transform2D];
// The effect starts from 1s, and the rotation animation will start from 2s
[effect setStartTime:1 * 1000 * 1000];
[effect setDuration:1 * 1000 * 1000];
// Add clip as the input of the effect. inputClip is a business-defined clip and is not created here
[effect addInput:inputClip];
// Add effect to composition. Composition is a business-defined composition and is not created here
[composition addClip:effect];
TAVColorTuningEffect
| Enter the number | Function | Precautions |
| 1 | Modify the Input color (including a series of color changes such as color temperature, hue, saturation, etc.) | The parameter Property timeline is relative to Effect, and the value range of the property is [-50, 50]. |
Example
The effect of changing saturation from -50 to 50 over time. The code is as follows:
【Android】
TAVColorTuning colorTuning = new TAVColorTuning();
TAVKeyframe[] keyframes = {
        TAVKeyframe.MakeLinear(0,1 * 1000 * 1000,-50,50)
};
TAVAnimatableProperty saturation = new TAVAnimatableProperty(keyframes);
colorTuning.saturation = saturation;

TAVColorTuningEffect effect = TAVColorTuningEffect.Make(colorTuning);
effect.setStartTime(1 * 1000 * 1000);
effect.setDuration(1 * 1000 * 1000);
effect.addInput(inputClip);
composition.addClip(effect);
【iOS】
// The attributes in colorTuning have a value range of [-50,50]
TAVColorTuning* colorTuning = [TAVColorTuning new];

// Construct a saturation property that dynamically changes over time
TAVAnimatableProperty* saturation = [TAVAnimatableProperty new];
// Create a linear animation from -50 to +50, the animation lasts for 1 second
saturation.keyFrames = [TAVKeyFrame MakeLinear:0 endTime:1 * 1000 * 1000 startValue:@(-50) endValue:@(50)];
colorTuning.saturation = saturation;
// TAVColorTuning has other parameters, please refer to TAVColorTuning.h for details
// Create effect based on TAVColorTuning
TAVColorTuningEffect* effect = [TAVColorTuningEffect Make:colorTuning];
// The effect starts from 1s, and the saturation animation will start from 2s
[effect setStartTime:1 * 1000 * 1000];
[effect setDuration:1 * 1000 * 1000];
// Add clip as the input of the effect. inputClip is a business-defined clip and is not created here
[effect addInput:inputClip];
// Add effect to composition. Composition is a business-defined composition and is not created here
[composition addClip:effect];
TAVLUTEffect
| Enter the number | Function | Precautions |
| 1 | Apply LUT graph to Input | The LUT intensity range is [0,1], and the LUT image format requirement is a 512*512 image. |
Example
Use LUT and set the intensity to 0.5. The code is as follows:
【Android】
String path = Utils.OUT_SAVE_DIR + "lut1.png";
TAVLUTEffect lutEffect = TAVLUTEffect.MakeFromPath(path);
lutEffect.setStrength(0.5f);
lutEffect.setStartTime(0);
lutEffect.setDuration(1 * 1000 * 1000);
lutEffect.addInput(inputClip);
composition.addClip(lutEffect);
【iOS】
// Obtain the path of the LUT image
NSString* lutPath = [[NSBundle mainBundle] pathForResource:@"lut1" ofType:@"png"];
TAVLUTEffect* lutEffect = [TAVLUTEffect Make:lutPath];
// Set the intensity of lut to 0.5
[lutEffect setStrength:0.5];
// Set start time
[lutEffect setStartTime:0];
// The setting duration is 1s
[lutEffect setDuration:1 * 1000 * 1000];
// Add clip as the input of the effect. inputClip is a business-defined clip and is not created here
[lutEffect addInput:inputClip];
// Add effect to composition. Composition is a business-defined composition and is not created here
[composition addClip:lutEffect];
TAVChromaMattingEffect
| Enter the number | Function | Precautions |
| 1 | Based on chromaticity matting | Intensity is the intensity of the cutout, and the value range is [0,1] - When the intensity is 0, there is no cutout, and when the intensity is 1, the chromaticity range is the largest. - Shadow is the edge softening degree, and the range is [0,1]. The larger the shadow, the more natural the edge will be. - selectedColor is the base color. |
Example
Based on black cutout. The code is as follows:
【Android】
// Create TAVChromaMattingEffect directly
TAVChromaMattingConfig config = new TAVChromaMattingConfig();
config.intensity = 0.2f;
config.shadow = 0.5f;
config.selectedColor = Color.BLACK;
TAVChromaMattingEffect effect = TAVChromaMattingEffect.Make(config);
// Set start time
effect.setStartTime(0);
// The setting duration is 1s
effect.setDuration(1 * 1000 * 1000);
// Add clip as the input of the effect. inputClip is a business-defined clip and is not created here
effect.addInput(inputClip);
// Add effect to composition. Composition is a business-defined composition and is not created here
composition.addClip(effect);
【iOS】
// Create TAVChromaMattingEffect directly
TAVChromaMattingEffect* effect = [TAVChromaMattingEffect Make:0.2 shadow:0.5 selectedColor:UIColor.blackColor];
// Set start time
[effect setStartTime:0];
// The setting duration is 1s
[effect setDuration:1 * 1000 * 1000];
// Add clip as the input of the effect. inputClip is a business-defined clip and is not created here
[effect addInput:inputClip];
// Add effect to composition. Composition is a business-defined composition and is not created here
[composition addClip:effect];
TAVPAGEffect
| Enter the number | Function | Precautions |
| Editable image layer smaller than PAG file | Use the input as the replacement layer of the PAG effect to apply the PAG effect. The scope of use includes transitions, atmosphere effects, PAG templates, etc. | PAG itself has width and height. If it is placed at different scales, the Matrix needs to be set according to requirements. |
Example1
Use PAG atmosphere files. The code is as follows:
【Android】
String path = Utils.OUT_SAVE_DIR + "fw.pag";
// Create PAGEffect
TAVPAGEffect pagEffect = TAVPAGEffect.MakeFromPath(path);
// Add clip as the input of the effect. inputClip is a business-defined clip and is not created here
pagEffect.addInput(inputClip);
// numImgs represents the maximum number of replacement layers supported by PAG
int numImgs = pagEffect.numImages();
// PAG files may have multiple replacement layers. You can open the PAGViewer tool to view the specific properties of the file
// Set the first inputClip as the replacement data of the 0th picture layer in the PAG file. After the setting is completed, TAVMedia can superimpose the effect on it
// When the width and height of inputClip are inconsistent with PAGFile, you can use replace:inputIndex:scaleMode: here.
// Set the inputClip scaling mode. For specific behavior, please refer to TAVScaleMode.h
pagEffect.replaceImage(0,0);
// This can be set to any length according to requirements. In the example, it is set to the file length
pagEffect.setDuration(pagEffect.fileDuration());
// Add effect to composition. Composition is a business-defined composition and is not created here
composition.addClip(pagEffect);
【iOS】
// Obtain PAGfile path
NSString* fwPath = [[NSBundle mainBundle] pathForResource:@"fw" ofType:@"pag"];
// Create PAGEffect
TAVPAGEffect* pagEffect = [TAVPAGEffect Make:fwPath];
// Add clip as the input of the effect. inputClip is a business-defined clip and is not created here
[pagEffect addInput:inputClip];
// numImgs represents the maximum number of replacement layers supported by PAG
int numImgs = [pagEffect numImages];
// PAG files may have multiple replacement layers. You can open the PAGViewer tool to view the specific properties of the file
// Set the first inputClip as the replacement data of the 0th picture layer in the PAG file. After the setting is completed, TAVMedia can superimpose the effect on it
// When the width and height of inputClip are inconsistent with PAGFile, you can use replace:inputIndex:scaleMode: here.
// Set the inputClip scaling mode. For specific behavior, please refer to TAVScaleMode.h
[pagEffect replace:0 inputIndex:0];
// This can be set to any length according to requirements. In the example, it is set to the file length
[pagEffect setDuration:pagEffect.fileDuration];
// Add effect to composition. Composition is a business-defined composition and is not created here
[composition addClip:pagEffect];
Example2
Use PAG transition files for transitions. The code is as follows:
【Android】
int movieDuration = 3_000_000;
// Construct movie1
TAVMovieAsset asset1 = TAVMovieAsset.MakeFromPath(Utils.OUT_SAVE_DIR + "1.mp4");
TAVMovie movie1 = makeMovie(asset1, movieDuration, width, height);
movie1.setDuration(movieDuration);
// Construct movie2
TAVMovieAsset asset2 = TAVMovieAsset.MakeFromPath(Utils.OUT_SAVE_DIR + "2.mp4");
TAVMovie movie2 = makeMovie(asset2, movieDuration, width, height);
movie2.setDuration(movieDuration);
// Obtain the PAG transition file path
String transitionPath = Utils.OUT_SAVE_DIR + "zc.pag";
// Create PAGEffect
TAVPAGEffect pagEffect = TAVPAGEffect.MakeFromPath(transitionPath);
// numImgs represents the maximum number of replacement layers supported by PAG
// The transition effect has more than two numImages
int numImgs = pagEffect.numImages();
// Add movie1, movie2 as input to effect
pagEffect.addInput(movie1);
pagEffect.addInput(movie2);

// Set movie1 and movie2 respectively to replace the first replacement layer and the second replacement layer in the pagfile
// Which two replacement layers to replace need to be determined according to the PAG file. Usually input0 corresponds to editableIndex0 and input1 corresponds to editableIndex1
pagEffect.replaceImage(0,0);
pagEffect.replaceImage(1,1);
pagEffect.setDuration(pagEffect.fileDuration());

// This can be set to any length according to requirements. In the example, it is set to the file length
movie2.setStartTime(movie1.duration() - pagEffect.duration());
// Set the transition to start together with movie2
pagEffect.setStartTime(movie2.startTime());
// Add effect to composition. Composition is a business-defined composition and is not created here
composition.addClip(pagEffect);
【iOS】
// Construct two video clips movie1 and movie2
NSString *moviefilePath1 = [[NSBundle mainBundle] pathForResource:@"1" ofType:@"mp4"];
NSString *moviefilePath2 = [[NSBundle mainBundle] pathForResource:@"2" ofType:@"mp4"];
NSInteger movieDuration = 3 * 1000 * 1000;

// Construct movie1
movieAsset = [TAVMovieAsset MakeFromPath:moviefilePath1];
TAVMovie *movie1 = [TAVMovie MakeFrom:movieAsset startTime:0 duration:movieDuration];
[movie1 setDuration:movieDuration];

// Construct movie2
movieAsset = [TAVMovieAsset MakeFromPath:moviefilePath2];
TAVMovie *movie2 = [TAVMovie MakeFrom:movieAsset startTime:0 duration:movieDuration];
[movie2 setDuration:movieDuration];


// Obtain PAG transition file path
NSString* zcPath = [[NSBundle mainBundle] pathForResource:@"zc" ofType:@"pag"];
// Create PAGEffect
TAVPAGEffect* pagEffect = [TAVPAGEffect Make:zcPath];
// numImgs represents the maximum number of replacement layers supported by PAG
// The transition effect has more than two numImages
int numImgs = [pagEffect numImages];

// Add movie1, movie2 as input to effect
[pagEffect addInput:movie1];
[pagEffect addInput:movie2];


//  Set movie1 and movie2 respectively to replace the first replacement layer and the second replacement layer in the pagfile
// Which two replacement layers to replace need to be determined according to the PAG file. Usually input0 corresponds to editableIndex0 and input1 corresponds to editableIndex1
[pagEffect replace:0 inputIndex:0];
[pagEffect replace:1 inputIndex:1];

// This can be set to any length according to requirements. In the example, it is set to the file length
[pagEffect setDuration:pagEffect.fileDuration];

// Set the start duration of movie2 so that movie1 and movie2 have the overlapping duration of pagEffect.duration as the transition duration
movie2.startTime = movie1.duration - pagEffect.duration;

// Set the transition to start together with movie2
pagEffect.startTime = movie2.startTime;

// Add effect to composition. Composition is a business-defined composition and is not created here
[composition addClip:pagEffect];
TAVMedia Export
Introduction to related classes
| Class name | Function |
| TAVExport | Export video |
| TAVMedia | Rendering structure to be exported |
TAVExport
TAVExport can directly export TAVMedia to the corresponding file path according to the set config parameters.
Example
【Android】
// Construct exported configuration
TAVExportConfig config = new Builder()
        .setVideoWidth(media.width()) // Configure the width of the exported video
        .setVideoHeight(media.height()) // Configure the height of the exported video
        .setOutFilePath(outputFilePath) // Configure exported file path
        .setUseHWEncoder(true)
        .build();
// Enable asynchronous thread export, callback is the exported callback function
new Thread(() -> new TAVExport(media, config, callback).export()).start();
【iOS】
// Get the data structure that needs to be exported
TAVMedia *media = [self makeExportMovie];
// Construct export parameters
TAVExportConfig *config = [TAVExportConfig new];
// Configure the width and height of the exported video
config.videoWidth = movie.width;
config.videoHeight = movie.height;
// Configure exported file path
config.outPath = [self exportPath];
// delegate is the callback agent TAVMediaExportDelegate of the export function, which supports obtaining progress, receiving failure errors, and accepting completion events
self.exporter = [TAVExport MakeMediaExport:media config:config delegate:self];
// Start export
[self.exporter exportMedia];